New web technologies and standards are introduced often. If a WP website was built before the technology/standard was launched, you may have to update your site to ensure it is not impacted by the changes or employs the latest technology for a great user experience. For example, before the WebP format was introduced, WordPress website administrators/editors/authors embedded JPG/PNG format images in blog posts. WebP was not adopted quickly by WP. When WordPress 5.8 with WebP support was launched in 2021, many WP users started using WebP format pictures in their posts instead of PNG/JPG images.
If a site is old and has hundreds of posts, optimizing/replacing/resizing pictures isn’t easy. Here’s when WordPress image optimization plugins come into the picture. The plugins will not only optimize photos but also ship with tools that will let you reduce the JPG/PNG size. WP repository has many optimization extensions. While exploring the repository, you may have come across/will come across an extension called “ShortPixel”. SP has a good rating of 4.5 and is used by thousands of users. What features does it offer? Is the extension better than its counterparts? Let’s find it out!

ShortPixel won’t add any optimization function to the Gutenberg editor. You should configure the plugin from its settings page.
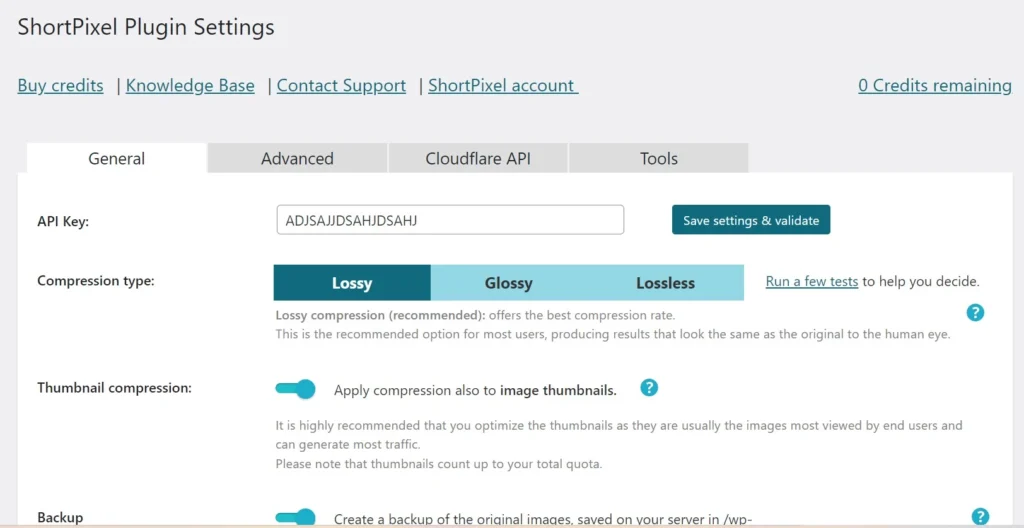
You will find four tabs if you open the image optimizer’s settings page. SP’s settings are available in these four tabs – General, Advanced, Cloudflare API, and Tools. Let’s have a look at the various options you will find in the tabs:
General
The General Tab lets you enable/disable these options:
Compression type: An image can be compressed using these types of compression algorithms – lossless and lossy. ShortPixel enables you to set one of these compression types – Lossy, Glossy, or Lossless. Before choosing a compression type, you can run a test to see how a picture looks after it optimizes the photo using the method you’ve chosen by clicking the test option.
Thumbnail compression: SP will ignore thumbnails while executing an image optimization task if this option isn’t enabled.
Exif: When an image is taken, the imaging device, such as the web camera, DSLR, etc, may add Exif information to the photo. If you want to get rid of the same, use this option.
Resize: Pictures taken with smartphones will be large. If you upload them to the server, they will take up a lot of space. If you embed such large photos in blog posts, the post’s loading time will increase. ShortPixel lets users activate its resizer tool, which will resize large images to a size of their choice.
In addition to these toggle options, you’ll find a textbox to enter the API key. The textbox is pre-filled with the ShortPixel API key.
Advanced
The 2nd tab on the settings page is “Advanced”. You can activate the following features from this tab:
Next-generation formats: SP supports these two modern formats – AVIF and WebP. Images of these two formats are smaller than PNG/JPG format pictures. You can enable both formats and configure the plugin to deliver the next-generation format pictures instead of the JPG/PNG ones you’ve uploaded.
In the “Advanced” section of ShortPixel, there’s an option to make the extension optimize photos when they’re uploaded, PDFs, Retina images, etc, and convert PNG format pictures to JPG format. ShortPixel can detect the color profile used in images and convert photos using the CMYK profile to RBG profile photos. If you don’t want it to optimize Thumbnails of a specific size, there’s an option to select the thumbnail sizes you want the extension to ignore.
By default, SP will analyze and work on folders in the wp-uploads directory. You can specify folders where you have saved or the theme/plugin has saved media files and PDFs in the Advanced settings.
This section boasts two buttons – save changes and “save and go to bulk process”. To configure the Bulk optimizer of ShortPixel, you should click this button. The Bulk Optimizer is nothing but a wizard that will let you optimize multiple pictures at a time.
The wizard has four parts. In the first part, you should select the images and the format in which you want ShortPixel to convert the chosen pictures. In the second part, the plugin shows the number of photos it has detected and the number of credits spent when you run the bulk optimizer.
Users of the free version of this extension are not allocated any credits. They should buy credits to use the bulk optimizer. In the wizard’s third step, you’ll see a progress bar and two buttons – “stop bulk processing” and “start bulk processing”. The last step of the wizard shows the results. The bulk optimizer settings page is available in the “library” menu of WordPress.
Cloudflare API
If you’ve activated Cloudflare CDN for your website, converted a photo to another format, or resized an image, the changes may not be reflected in the live version of the page. To fix this issue, you should enter the Cloudflare Zone ID and Token in the Cloudflare API section.
Tools
The tools tab enables you to undo all optimizations, remove legacy data, eliminate every trace of ShortPixel data, remove backed-up images, and clear the plugin’s queue.
Our experience
SP does the job of optimizing photos silently in the background. Once you configure it correctly, you don’t have to open the settings page again. The plugin reduced the size of dozens of pictures on our server and freed some space. The PNG/JPG quality was intact.

